
1.MotionCaster Manual
Introduction
This manual guides you through installation of MotionCaster, input of video, input of media file, transition, live streaming, recording and external output.
We also provide clip videos on how to create titles, virtual studios, and scoreboards with our built-in powerful graphic tool, the title maker.
1.1.About MotionCaster
About MotionCaster
MotionCaster is most powerful live streaming software of the world. Regardless of your computer’s performance, you can quickly and easily manipulate the desired live video and streaming to multiple destinations. You can make your live broadcast more lively and fun by instantly composing and processing titles and various video and images, and various effects.
1.1.1.Installing
Installing
Mac
To install MotionCaster for mac, follow these steps:
1. Download the installer from the Website at : https://www.motioncaster.com
2. Run the installer (.dmg) program.
3. Open the MotionCaster in the downloads folder, then click and drag the icon into the Applications folder.

Windows
To install MotionCaster for win, follow these steps:
1. Download the installer from the Website at : https://www.motioncaster.com
2. Run the installer (.exe) program.

1.1.2.Uninstalling
Uninstalling
Mac
To uninstall MotionCaster, place the MotionCaster program in the Trash folder.
Windows
To uninstall MotionCaster for win follow these steps:
1. Go to the installation folder (C:\Program Files (x86)\Softworks\MotionCaster)
2. Run the the uninstall(.exe) program.
1.1.3.System Requirements
System Requirement
MotionCaster is a live streaming software that does not require high system requirements, frames drop rates are low and video processing is fast.
Operating System
Mac
• Minimum: macOS 10.8+
Windows
• Minimum: Windows7+ 64bit
Processor
• Minimum: i3 @ 2.0GHz
• Recommended: i5 dual-core @ 2.3GHz+
Memory
• Minimum: 2GB RAM+
Graphic Card
• Nvidia GeForce or AMD Radeon, 1GB+ video memory
1.2.Getting Started
Getting Started
Run MotionCaster, you can select exsiting project or create a new project from the project setting windows.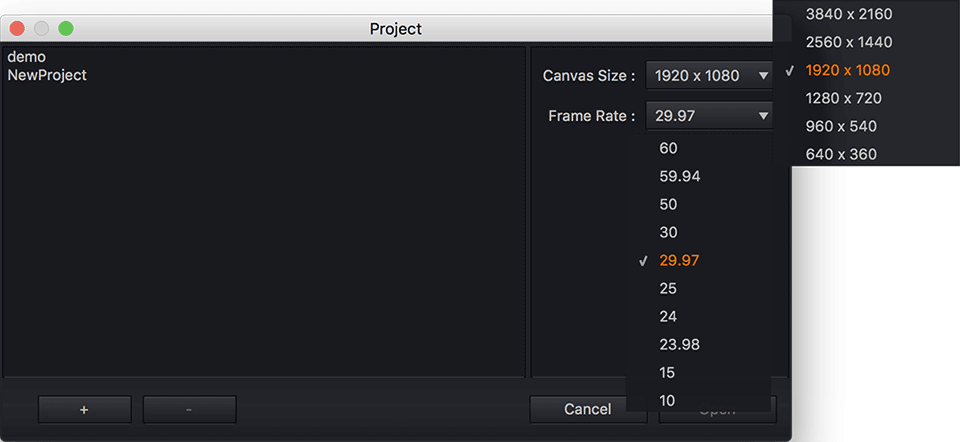
1. Select Canvas : Select the project resolution.
2. Frame Rate : Select the project fps.
3. + Button : Create new project.
4. – Button : Delete selected project.
User Interface Overview
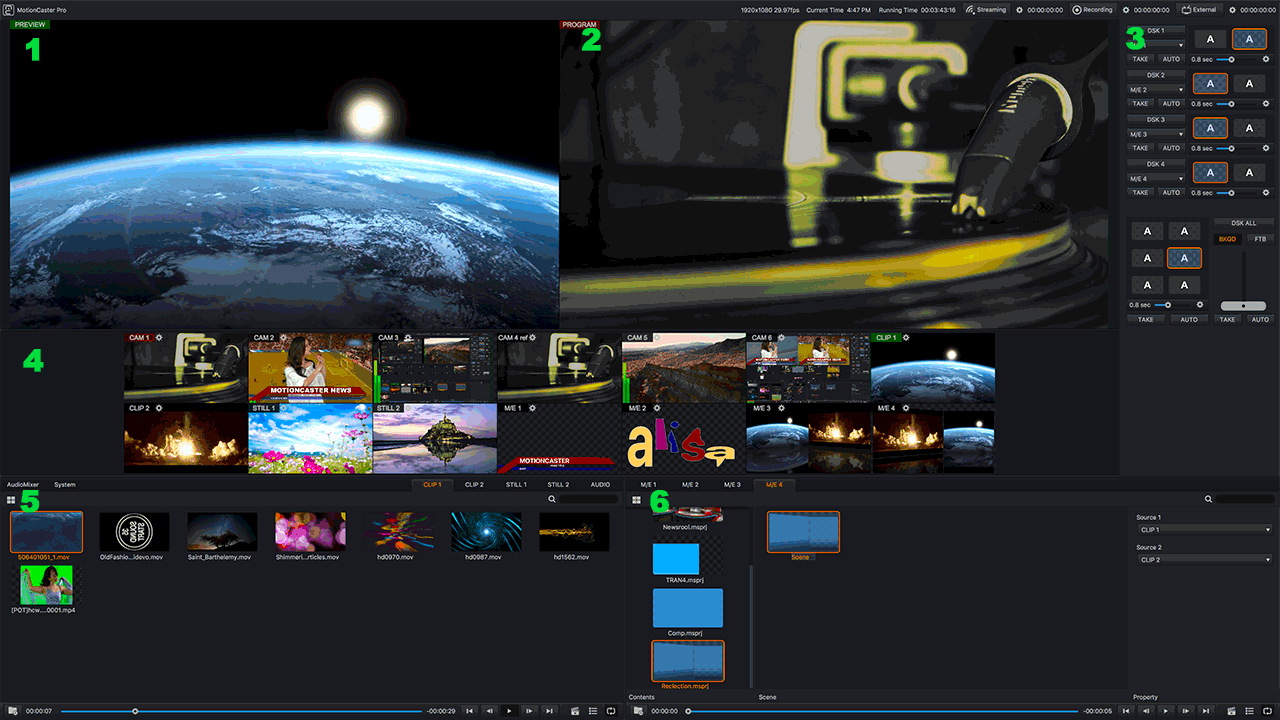
1. PREVIEW WINDOW
An input you wish to display should be placed in this preview window first.
In the source preview, the left mouse clicked source is display in the preview.
Tip
Double-clicking on the preview window switches the transition to the program window.
2. PROGRAM WINDOW
The content that is currently showing in your recording and/or stream; it is what your viewers are currently watching.
3. SWITCHER(Transitions and Overlays browser)
The switcher can be set up and manipulated, such as preview/program switching, overlay and transition of the contents in Mix/Effect browser and source preview.
4. SOURCE PREVIEW
The source preview is the preview area of the video source of the capture card or NDI device on the local or network and the media browser and mix effect browser source.
5. MEDIA BROWSER
The Media Browser is the area that manages video clip sources, image sources, and audio sources.
6. MIX / EFFECTS BROWSER
The Mix/Effect combines and arranges a variety of sources with the following features to make broadcasts richer and more flexible.
– Mix/Effects in Mix/Effects.
– Title/PIP/Virtual Studio content create and management.
– Create/Duplicate/Edit scene.
1.3.Input(Sources)
Input(Sources)
MotionCaster allows you to easily select and use sources of video, video clips, images, audio, etc., locally or over a network, and instantly graphically edit each source for immediate overlay.
1.3.1.Videos
Videos
In the Motion caster, you can simply select a video source from the list of connected cameras on your local or network.
The selected video source is displayed in the source preview and can be sent to the preview window or program window at any time you want.
The following is a screenshot for entering a video source.
First, click the Settings button in the Source Preview window.
Source Preview
Tip
Left-click on the source preview to display it as a preview.
Right-click on the source preview to display it as a program.
Input Setup
The following is a screenshot of the Settings popup that appears when you press the Settings button.
In this setup pop-up window, you can select local source or network source and set details such as resolution, audio and broadcast format.
Input : Select a local source or network source to set the effect of the input video.
Local Source

Video Device : Select the video input from auto-detected local input devices

Video Connection : Select the video connection cable from the local input device.

Video Format : Select a video format that is appropriate for your broadcast environment.
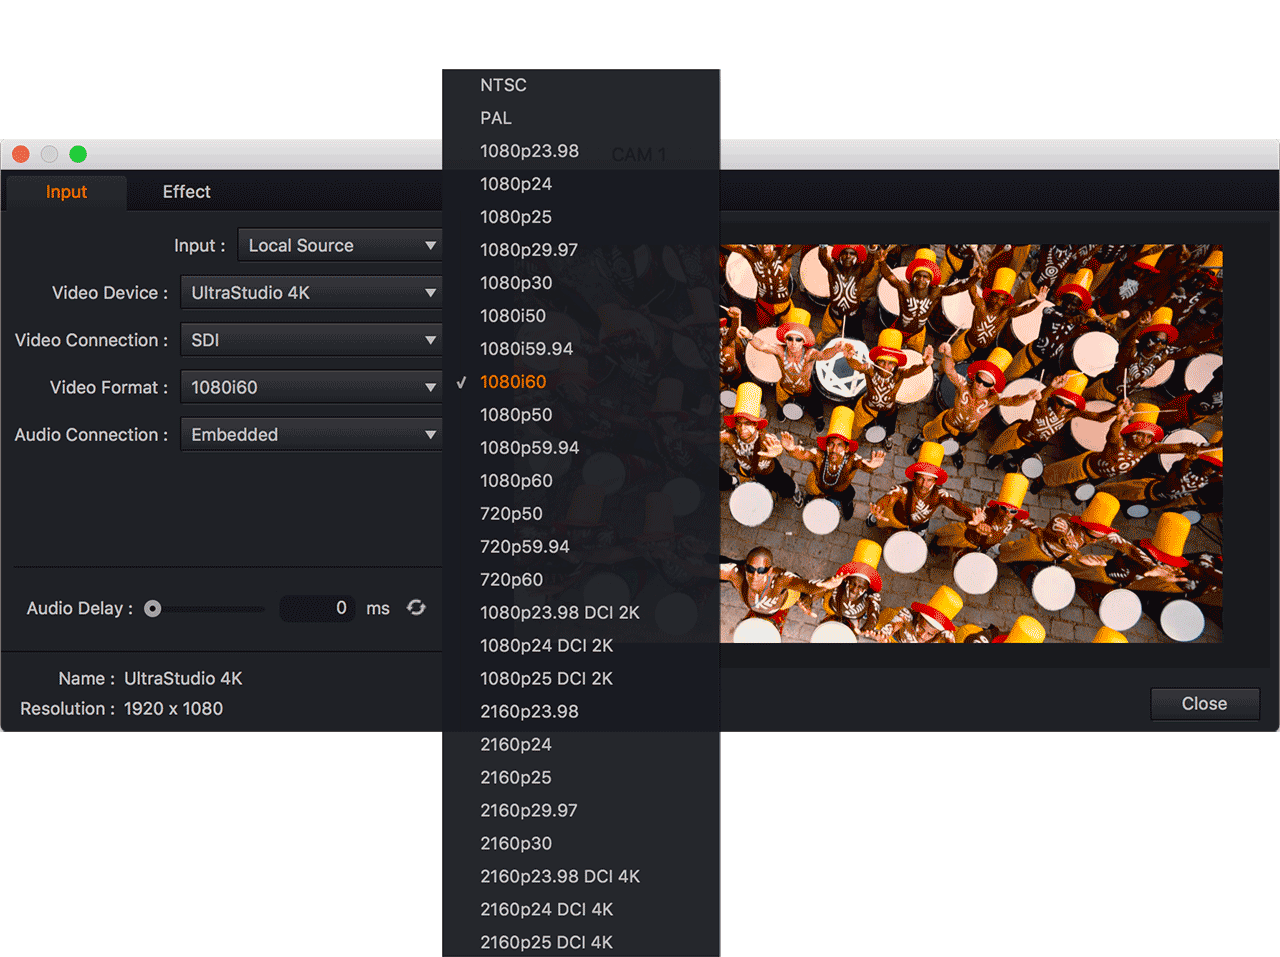
Audio Connection : Select an audio connection device.
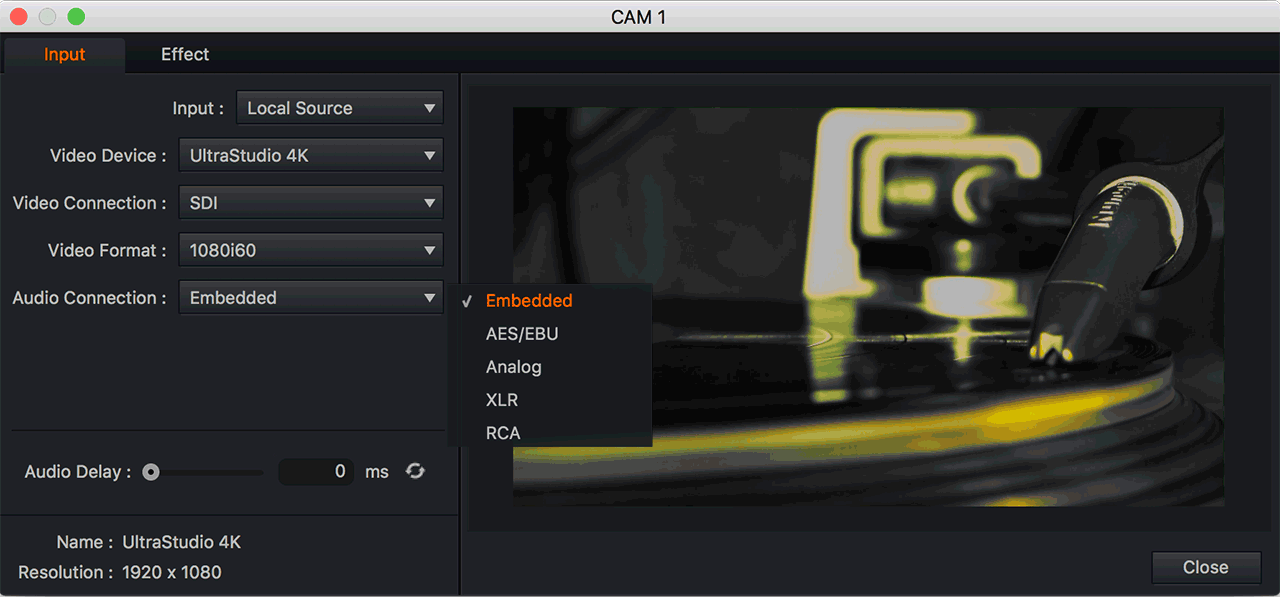
Audio Delay : Adjust input audio sync in milliseconds.
Name : Input device name
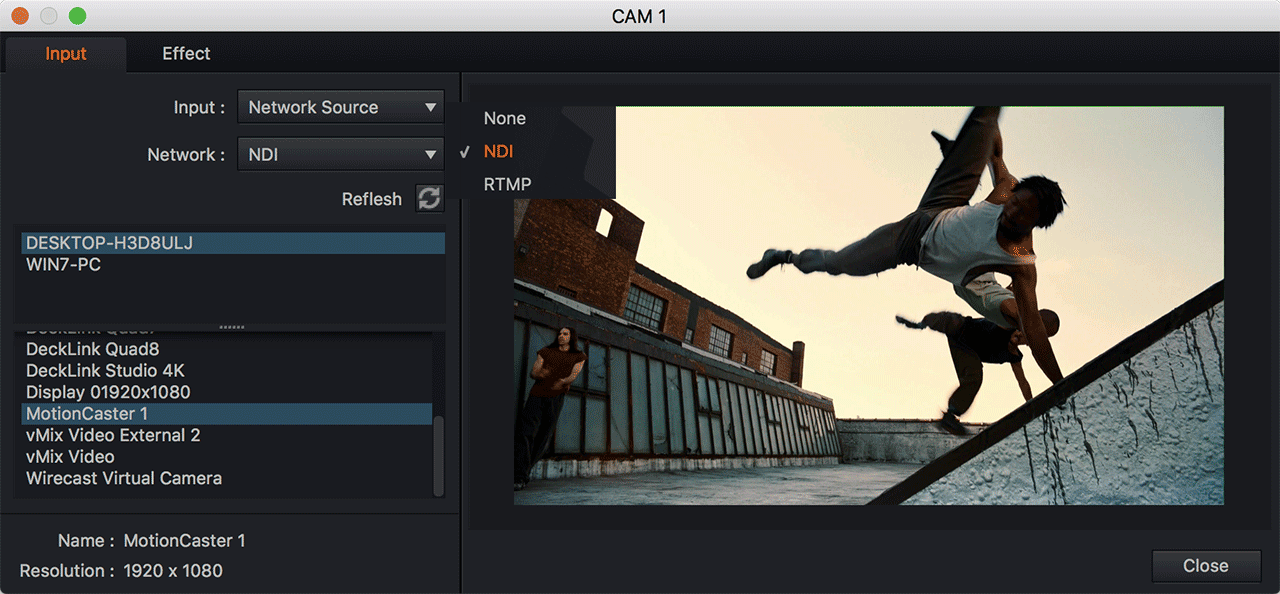
Network Source
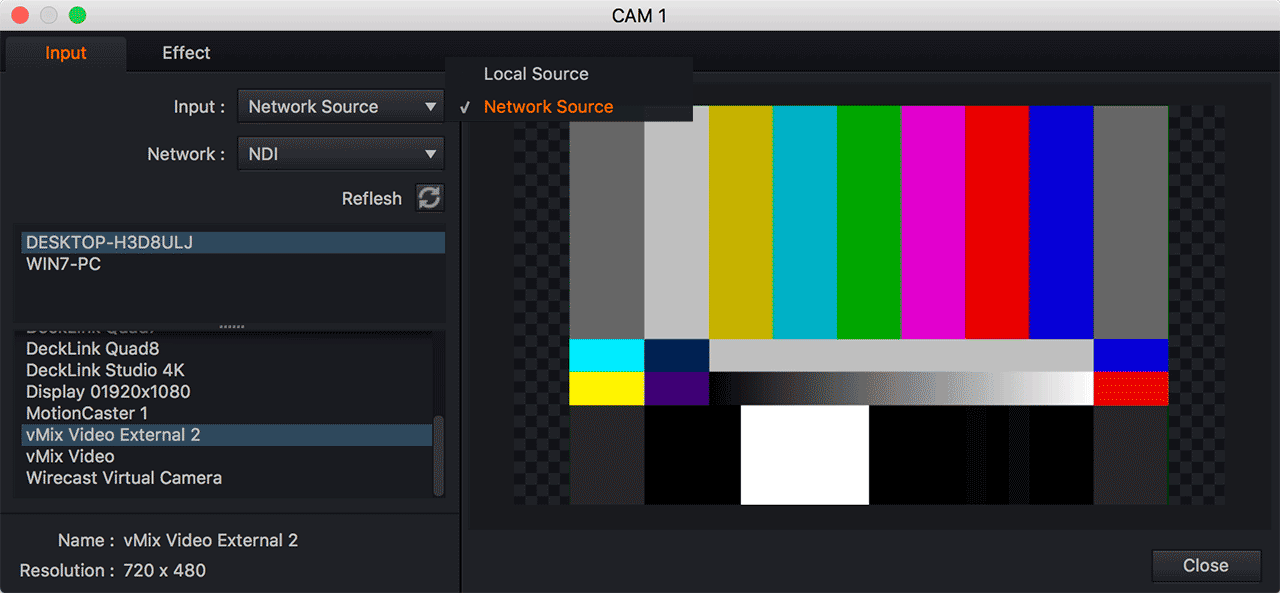
Network : Connect network resources of NewTek NDI or RTMP.
Effect
Output your own video by applying high-quality chroma key, sharpness, brightness contrast, hue saturation and level effect to the input video source.
live video chroma key software
Chroma key compositing, or chroma keying, is a visual effects / post-production technique for compositing (layering) two images or video streams together based on color hues (chroma range). The technique has been used heavily in many fields to remove a background from the subject of a photo or video – particularly the newscasting, motion picture and videogame industries.

HipassSharpen
HipassSharpen is an editing tool that lets you move and stretch the sharpen radius of a movie or image.
BrightnessContrast
BrightnessContrast is an editing tool that allows you to move and stretch the brightness and contrast values of a movie or image.
HueSaturation
HueSaturation is an editing tool that lets you move and stretch the hue and saturation values of a movie or image.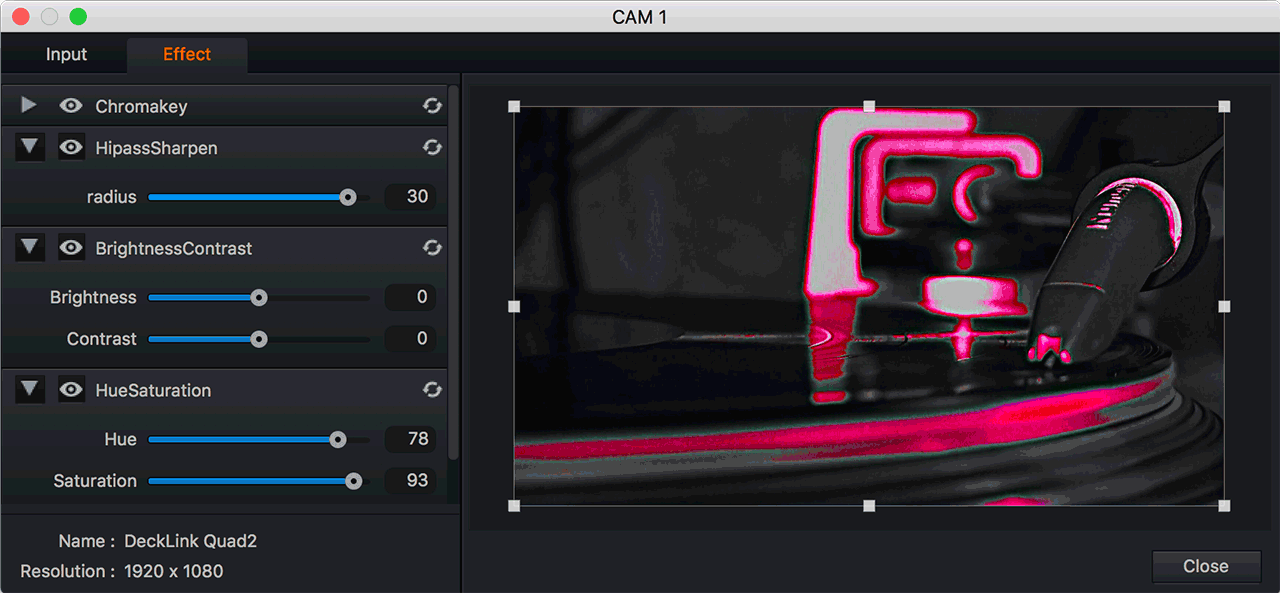
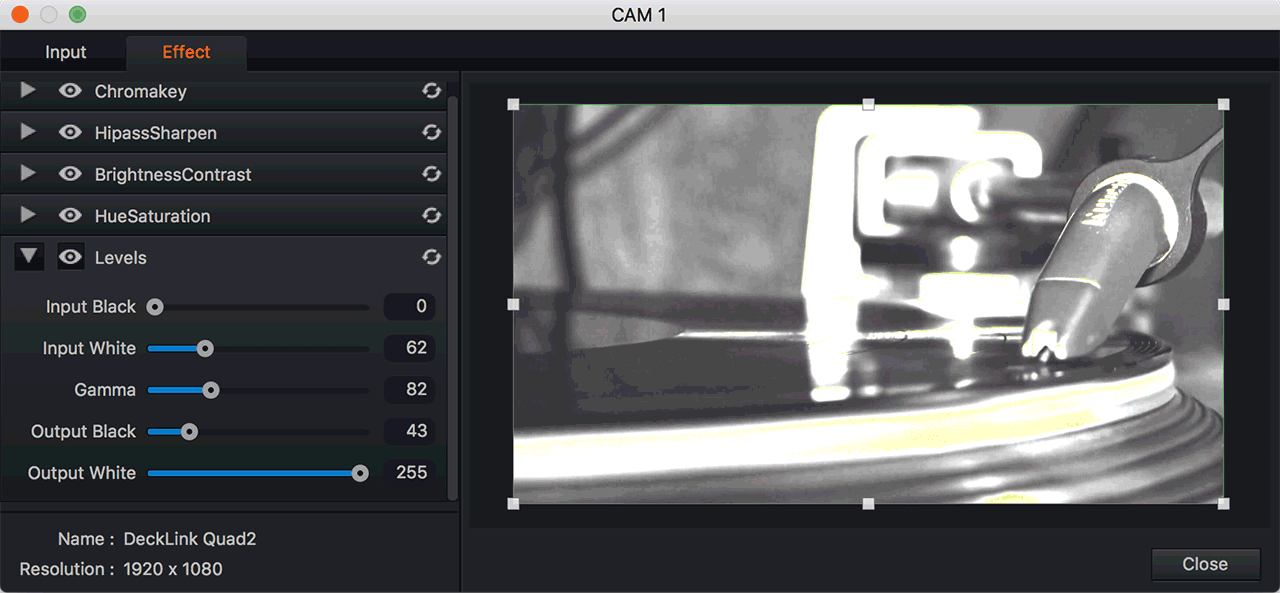
Levels
Levels is an editing tool that lets you move and stretch the brightness level of a video or image. You can adjust the brightness, contrast, and tonal range by specifying the positions of full black, full white, and midtones.
1.3.2.Clip Files
Clip Files
Click the Import button to import the clip source from local PC using Mac Finder or WindowsExplorer.
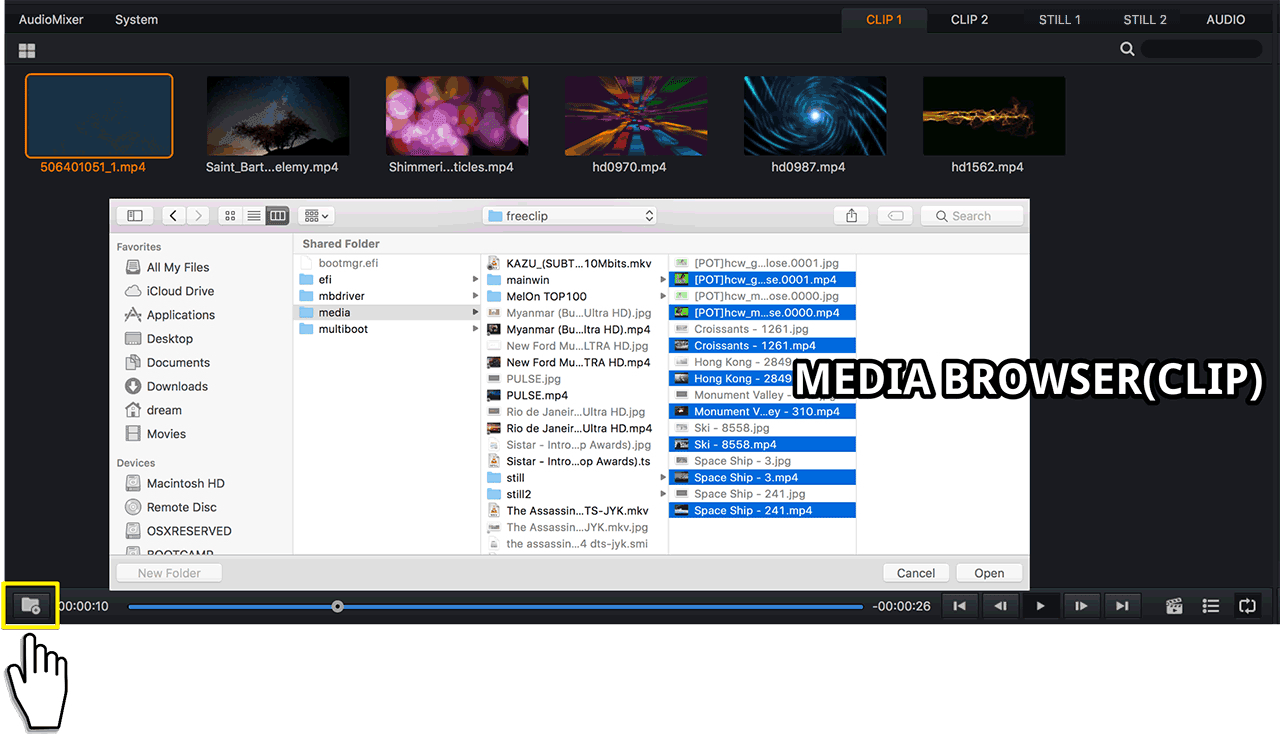
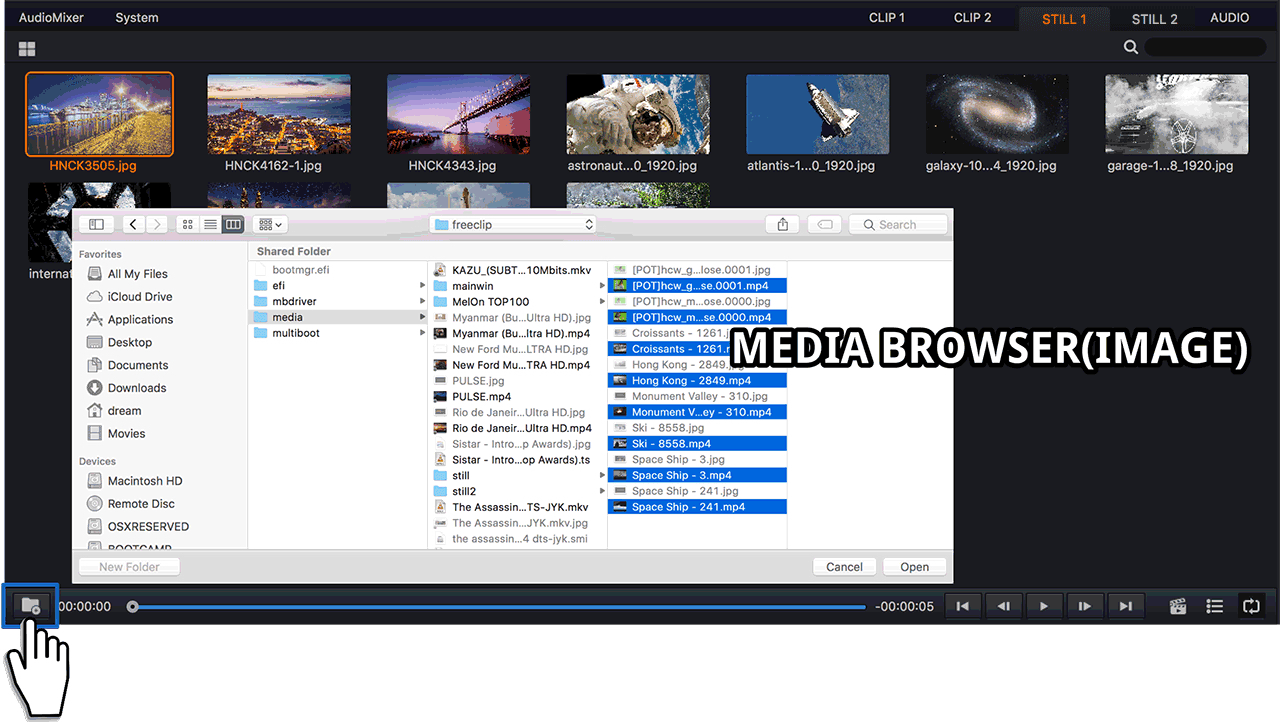
1.3.3.Image Files
Image Files
Click the Import button to import the image source from local PC using Mac Finder or Windows Explorer.
1.3.4.Audio Files
Audio Files Import
MotionCaster provides a media browser that manages different types of media files.
It provides a media browser that can manage only audio files separately.
And because it has built-in media player at the bottom, it provides operational convenience through functions such as forward and backward file move, list play and replay.
When the four window buttons at the top left are clicked,
Multiple selection of list is possible, so it is easy to remove part of audio file and initialize list.
How to import audio files
Click the Import button to import the image source from local PC using Mac Finder or Windows Explorer.
1.3.5.Mix / Effects
Mix / Effects
You can create richer broadcast videos by overlaying graphic content such as videos or images for live streaming.
MotionCast provides a Mix / Effects browser to manage and apply various contents at a glance.
1. You can create the subtitles for broadcasting and register them in the list and use them at any time.
2. You can create a PIP and register it on the list to use it at any time.
3. You can create your own virtual studio and register it on the list to use at any time.
4. Any other broadcast content It is easy to manage and reuse through mix / effects.

Integrated Media Players
MotionCaster provides mediaplayers for captions, graphics, video clips and audio files for live broadcasts.

1.4.Output
Output
The output of the MotionCaster consists of three functions.
The first is a live streaming output function that sends live video to websites such as YouTube, Facebook, and Twitch.
Live streaming to multiple destinations at the same time You can show your videos to as many viewers as possible.
Second, video files such as mp4, mov, and mkv can be applied to record video files in various formats at the same time.
The third is the external output function which outputs video to the inside and outside using the capture device.
All of the functions described above can be performed at the same time, It will help you to operate stable and professional broadcasting.
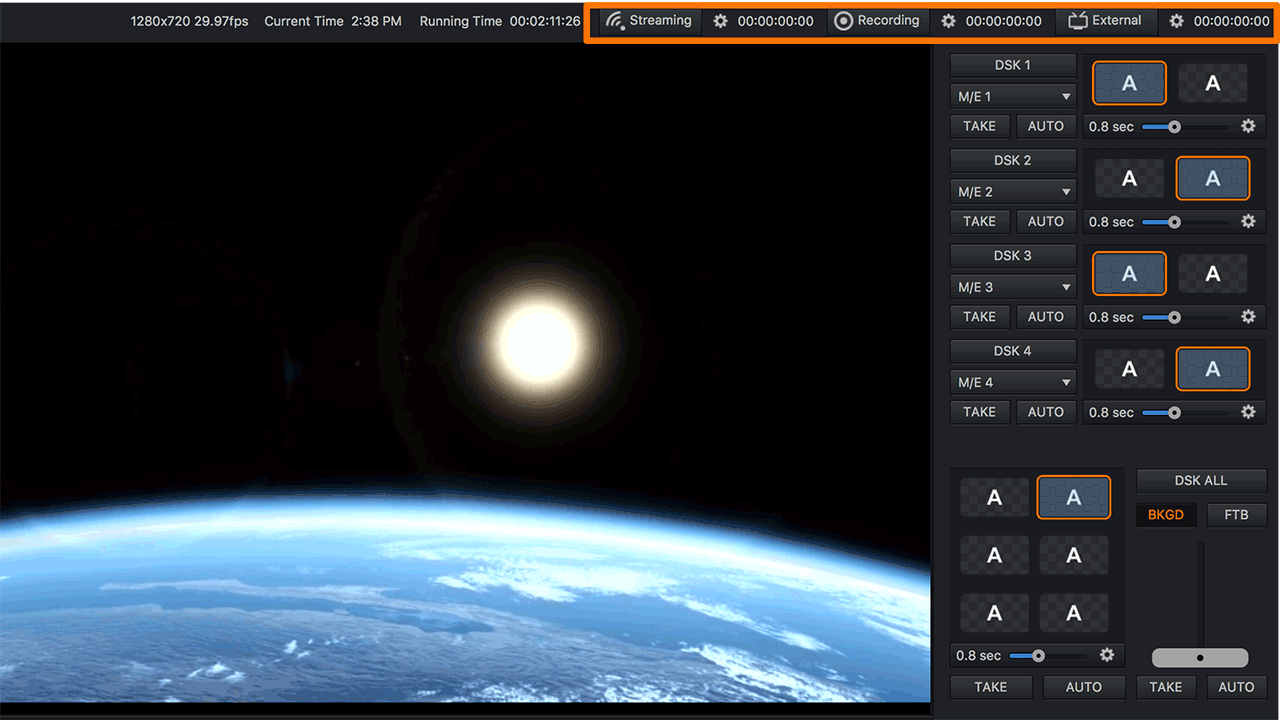 In the upper right corner of the MotionCaster interface,
Streaming button / Streaming time / Streaming settings button
Recording button / Recording time / Recording setting button
External output button / External output time / External output setting button
1.4.1.Live Streaming
Live Streaming
Motioncaster provides multiple live streams and recording and output simultaneously.
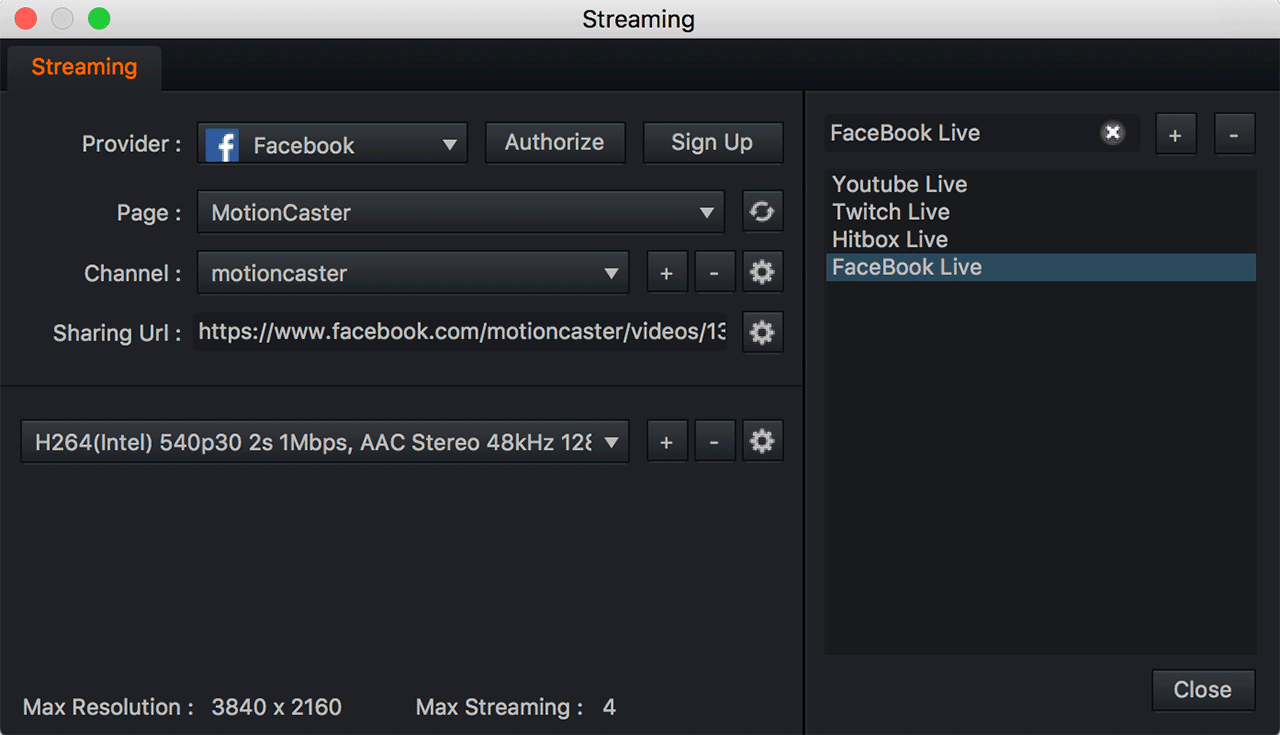
Provide
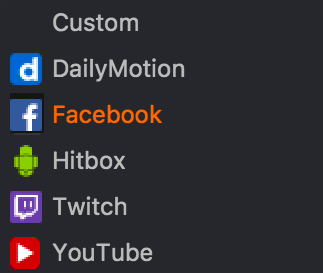
Custom : rtmp server custom settings.
DailyMotion : Add channels after authentication and live stream.
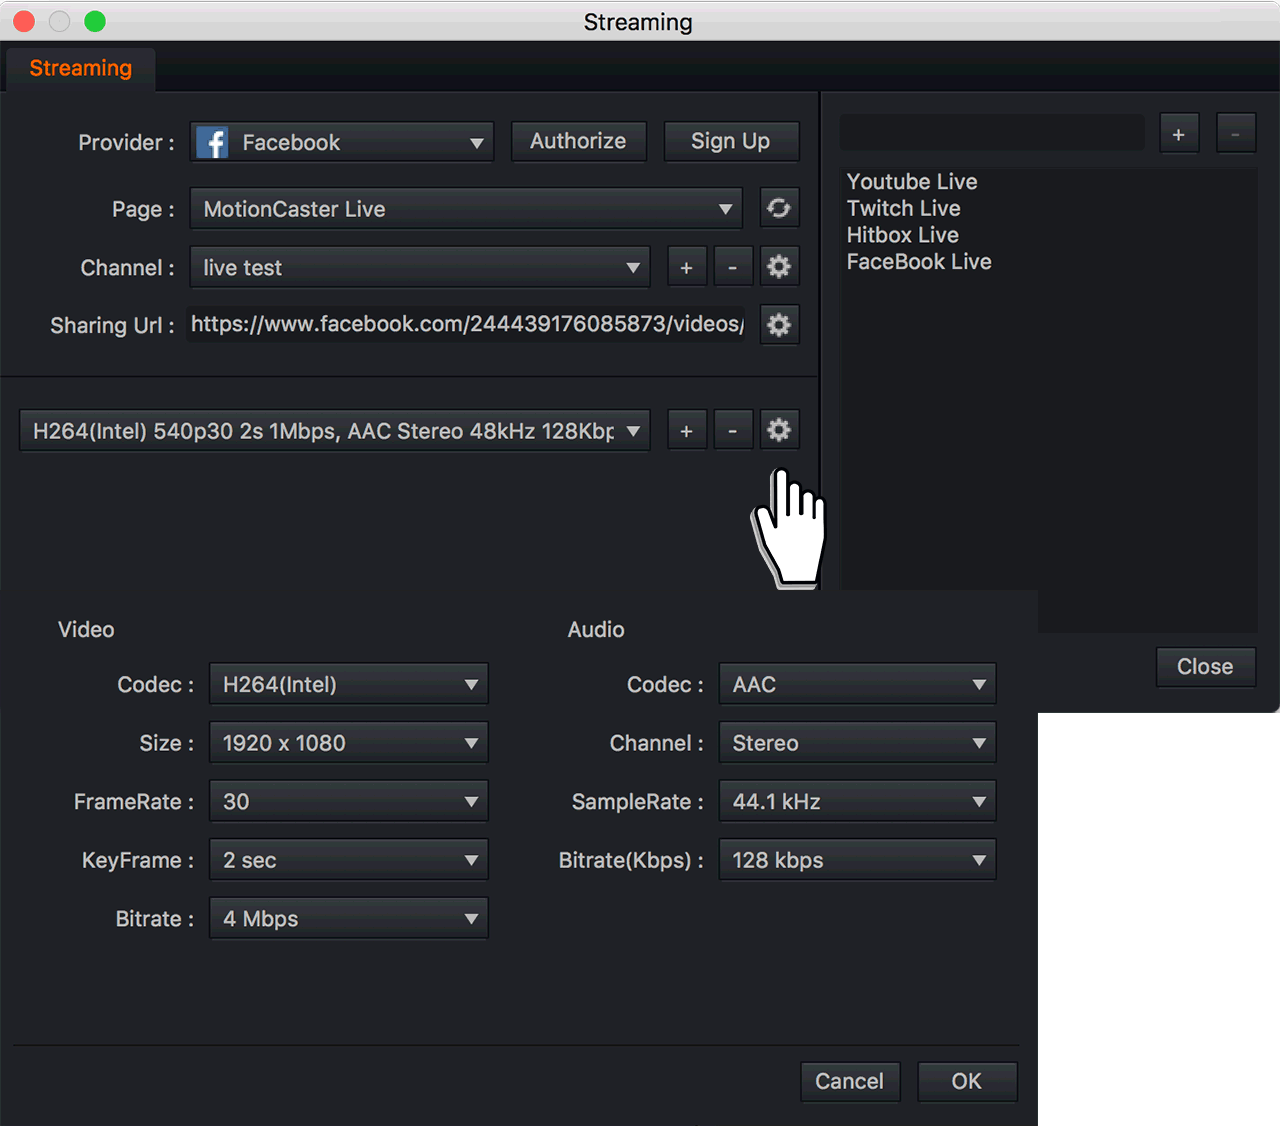
Facebook : Select page after simple authentication and add channel.
Hitbox : After authentication, it finds the optimal server.
Twitch : After authentication, it finds the optimal server.
Youtube : Add channels after authentication and live stream.
Page
Facebook page to post live.
Channel
Channels of Youtube, Facebook, and Daily Motion to post live.
Sharing Url
Share url address where your live is posted.
Video Format
Set the video format for the best live experience for each video platform.
Tip
• Requires internet connectivity with HTTP/HTTPS port 80, and RTMP port 1935 open forstreaming.
• For lowest quality (360p) streaming an upload rate of at least 1000Kbps is required.
• 720p streaming requires an upload rate of at least 2500 Kbps.
• 1080p streaming requires an upload rate of at least 5000 Kbps.
• Consider lowering your canvas frame rate and/or streaming resolution to lower CPU usage.
• It is recommended that an upload rate of at least double the desired rate be available.
• External game play may also require a portion of your internet upload bandwidth.
• For Replay functionality, SSD drive for Replay storage is recommended.
• Internet connectivity with HTTP/HTTPS port 80, and RTMP port 1935 open for streaming.
• Upload rates:
– 1000Kbps minimum for 360p streaming.
– 2500Kbps minimum for 720p streaming.
– 5000Kbps minimum for 1080p streaming.
1.4.2.Recording
Recording
MotionCaster supports mov, mp4, mkv, etc. Especially mov container supports Apple’s prores codec to record video in various formats.
You can set detailed settings for video resolution, frame rate, bit rate, and audio codec for various broadcasting environments.
In addition, you can set the file split recording time for movie editing and you can record up to 4 simultaneous (MotionCaster Pro).
Also you can record your choice between original video and overlay video.
Format
To record the encoding format, choose between mp4, mov, and mkv.
Video format customization settings.

Split File
Record split files at selected time units.
Source
Selective recording of overlayless original (clean) video or overlayed composite video.

1.4.3.External
External
You want to create a live or recorded broadcast and send it to viewers via the web or via a repeater.
External output of the MotionCaster is available at the same time as web live streaming.
ISO output is also supported so that you can specify the original video without overlays and output it.
You can specify multiple destinations and select the program for each destination.
Because the video format can be customized, it provides flexibility to cope with various broadcast environments.

1. Select the output device.
2. Select the video format that is appropriate for your broadcast environment.
3. Select the source you want to output.
Program : This is the video currently output in the program window.
Program (clean) : This is a video of the program window in which overlay effects such as pip and subtitles are removed.
4. Press the OK button to start external output.
1.5.Switcher(Transition Browser and Overlays)
Switcher(Transition Browser and Overlays)
MotionCaster’s built-in switchers are designed to be more manageable, intuitive, and versatile in a variety of environments, while still sticking to traditional switches.
Subtitles, virtual studio, PIP, video source, etc.
Selects all input media sources as the desired dsk channel, allowing up to four overlays.Experience the infinite expansion of content with the Mix/Effects in Mix/Effects.
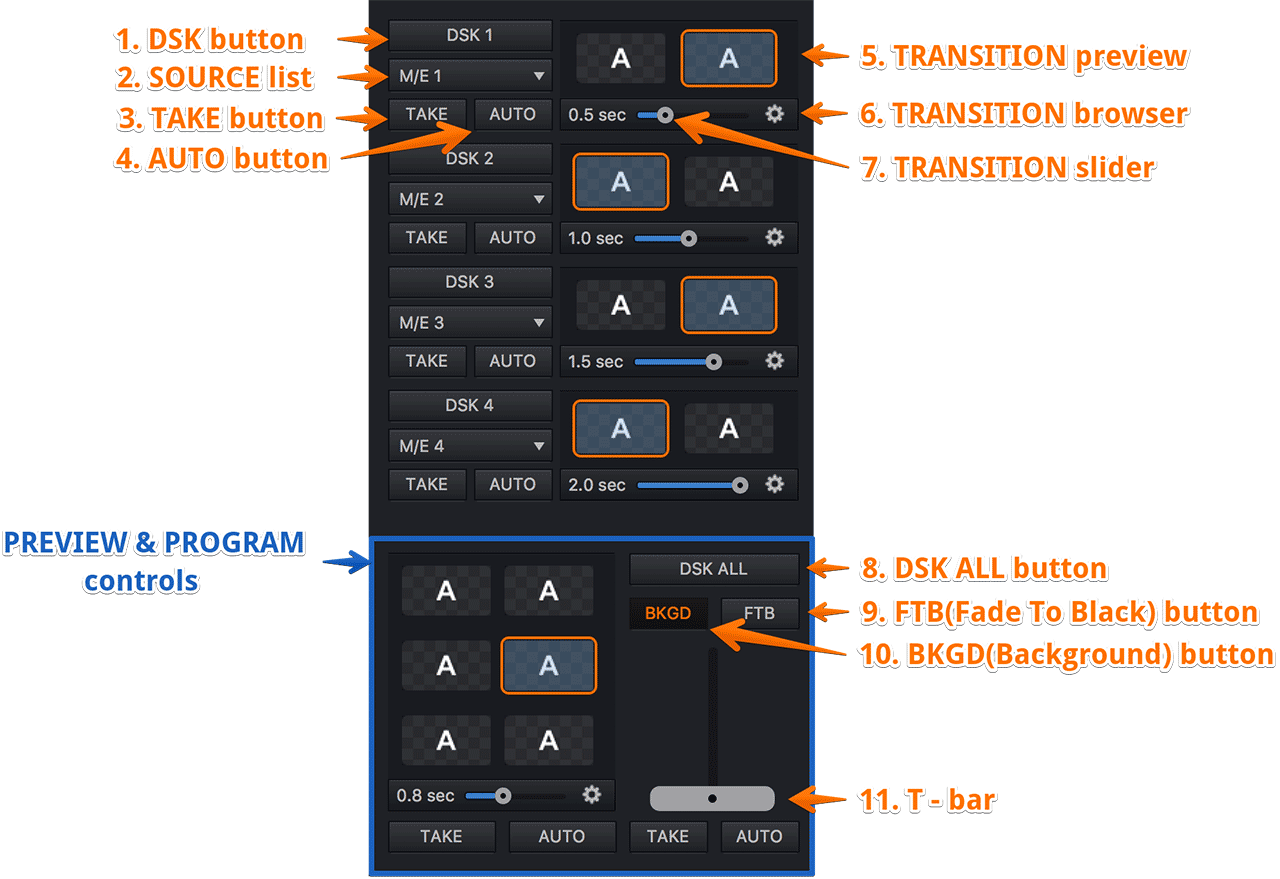
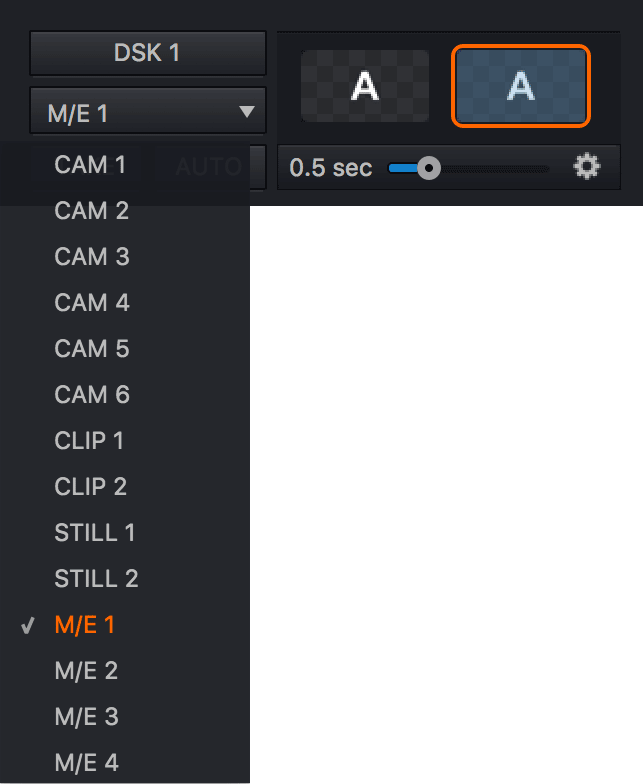
1. SOURCE list
Connect the various input sources of the MotionCaster to the dsk channel. This allows unlimited use of the source.
2. DSK button
To overlay the source linked to the DSK channel on the preview, press the DSK button.
3. TAKE button
Press the Take button to overlay the source connected to the DSK channel.(When you press the take button at the bottom of the switcher, the preview and the program are exchanged without the transition effect.)
4. AUTO button
Press the auto button to overlay the source linked to the DSK channel with the transition effect.
(When you press the ATUO button at the bottom of the switcher, the preview and the program are exchanged with the transition effect.)
5. TRANSITION preview
30 creative transition animation preview presets built into the MotionCaster.
(Double-clicking opens the transition browser.)
6. TRANSITION broswer
![]()
7. TRANSITION slider
Set transition effect duration.
8. DSK ALL button
All dsk buttons are clicked.
9. FTB button
The program fades and turns black.
10. BKGD button
When the BKGD button is activated, dsk and background video will be transitioned together when you click the TAKE or AUTO button at the bottom.
11. T-bar
The T-bar mimics the similar control on a traditional video switcher, and allows you to manually perform atransition between selected video layers. To use the T-bar, pull it downward by dragging it with the mousepointer. Drag it all the way to the bottom and release to complete a transition.
1.6.Title Maker
Title Maker
MotionCaster’s built-in Title Maker is a tool for creating your own graphic sources such as subtitles, virtual studios, picture in picture (PIP) and scoreboards.Featuring a powerful, lightweight, fast and intuitive interface,this title maker makes it easy for anyone to create their own graphic source with just a few mouse clicks.
First, right click on the ME browser and select new.

Then the title maker appears.
Draw a graphic object on the canvas, or connect the desired source (a video or image) to the object.
Makes a chromakey effect. It can also have a different effect.
Configure the virtual studio by placing the image source.

Live title
Virtual Studio
Virtual Weather